AWS Account Setup
Once you have created your account on Orchestera Platform, you will be required to setup an AWS account.
Note that we currently only support AWS as the cloud provider and our services are limited to us-east-1. We are working on adding more AWS regions very soon. Please see the roadmap for details.
We highly recommend that you setup a separate AWS Organization to setup your Spark cluster. This allows you to separate your resources and billing for your Orchestera managed Spark clusters and prevents any interference to your other AWS account resources. There is no additional cost from AWS for setting up a separate AWS Organization.
Setting up a new AWS Organization
Section titled “Setting up a new AWS Organization”This assumes that you have access to your main AWS root account. If not, ask your organization admin to perform the following steps instead:
Enable multi-session support
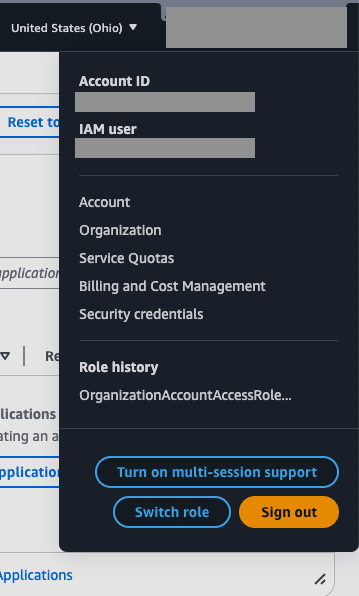
Section titled “Enable multi-session support”To enable multi-session support in your AWS account:
- Log into the AWS Console
- Click on your account name in the top-right corner
- Look for the “Turn on multi-session support” button in the dropdown menu
- Click the button to enable multi-session support
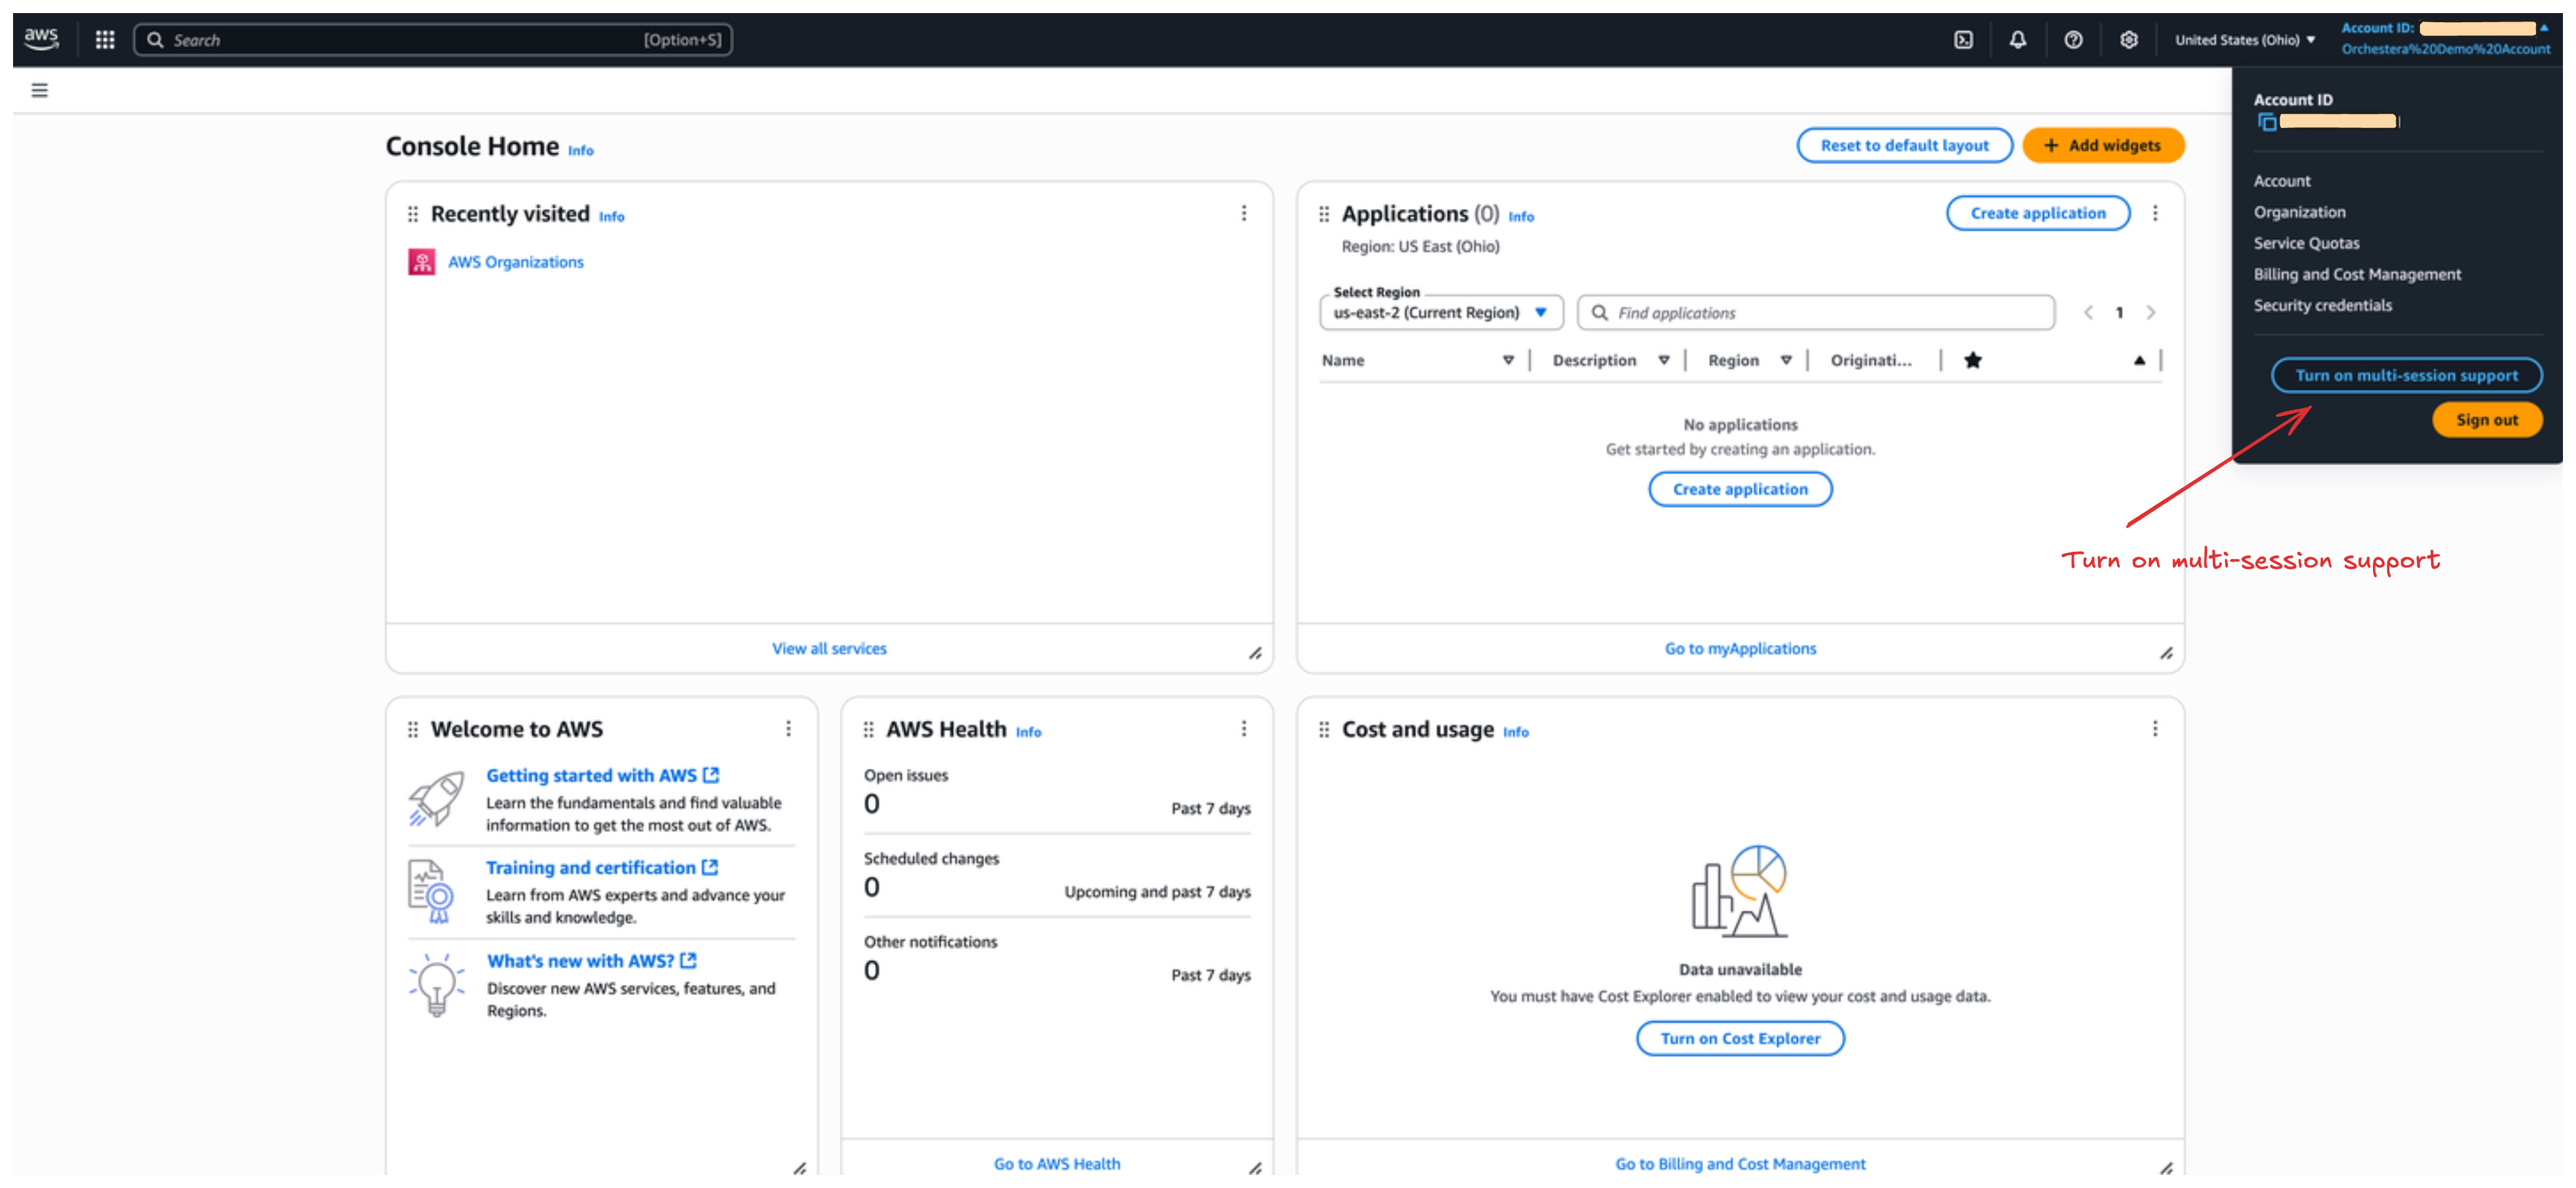
This feature allows you to have multiple browser sessions open simultaneously, which is useful when working with different AWS accounts or regions.
Convert your root account to a management account
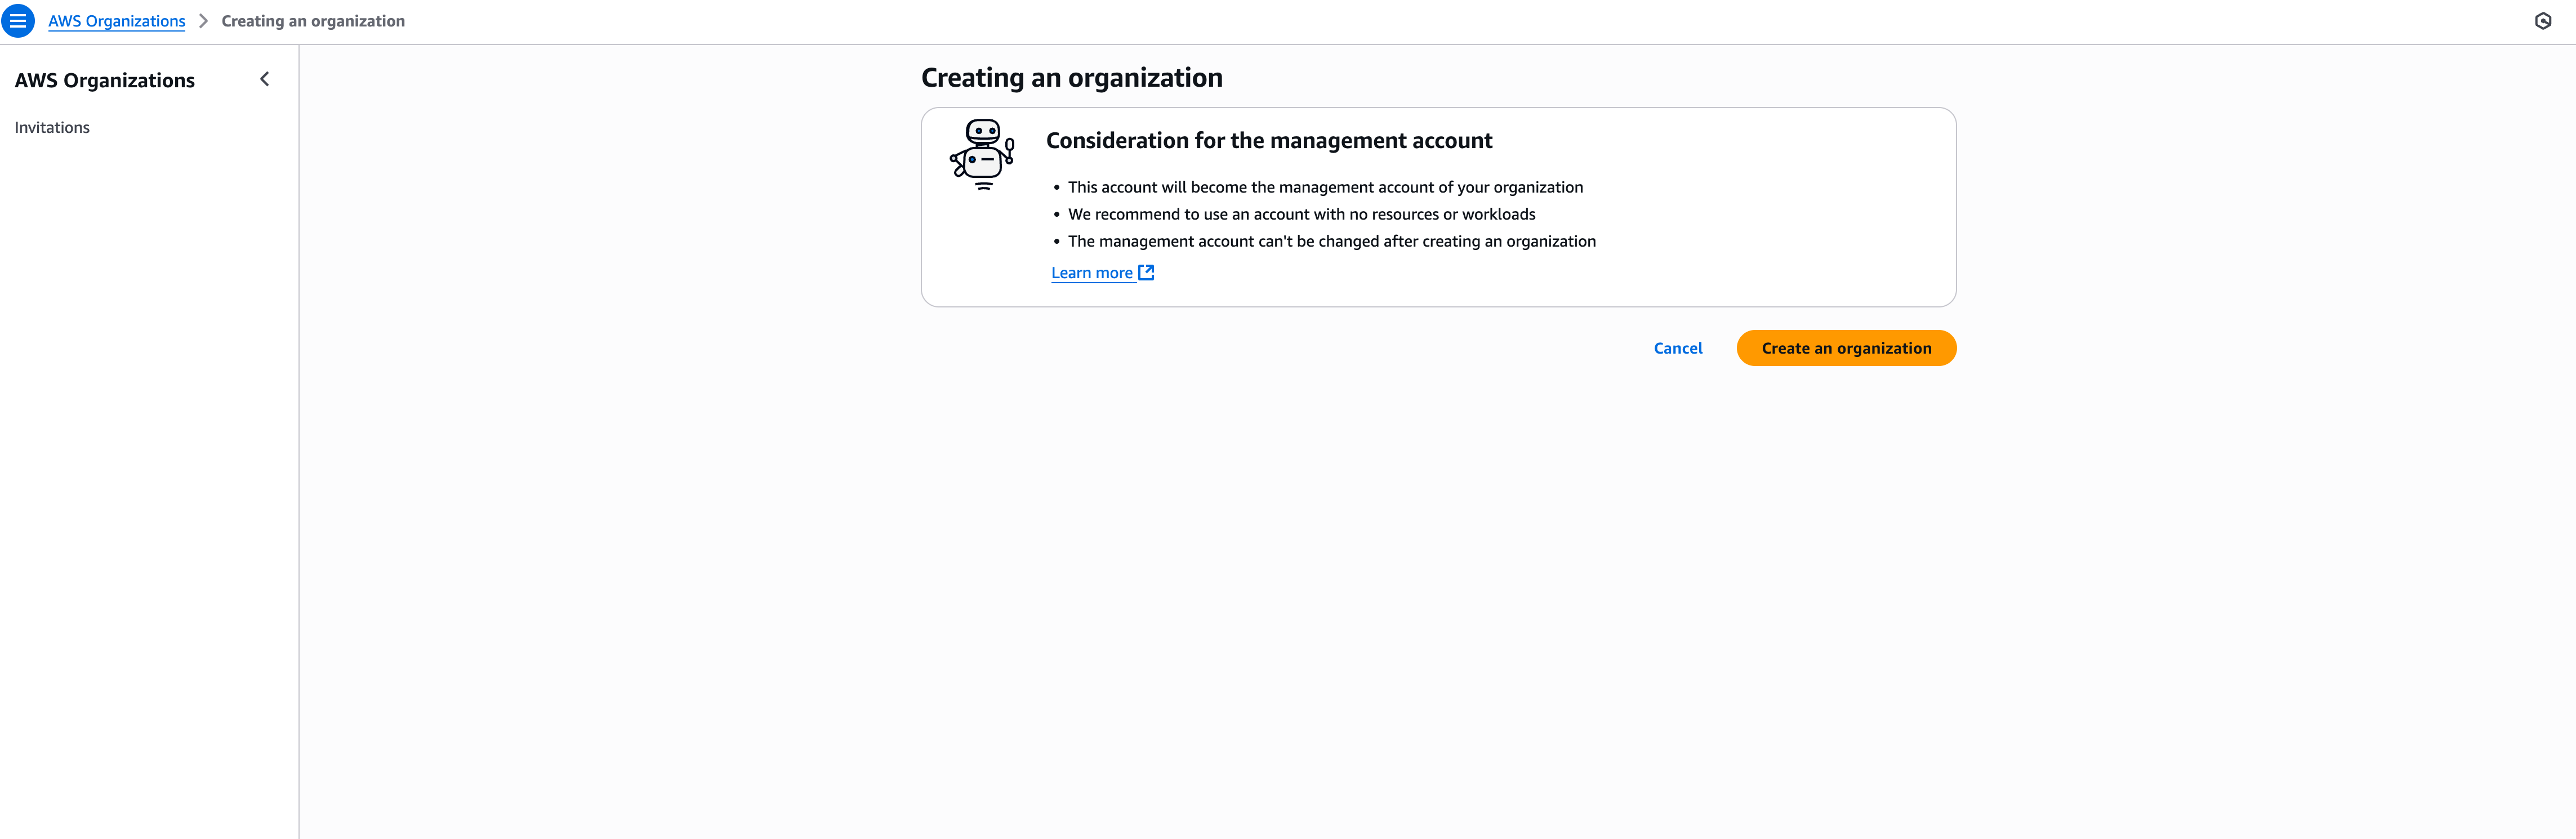
Section titled “Convert your root account to a management account”Go the AWS Organization page in your AWS console and click Create Organization. If this is the first organization that’s being created, you will see the following prompt. Click Create an organization button. If you already have AWS Organization enabled, you can skip to the next step.
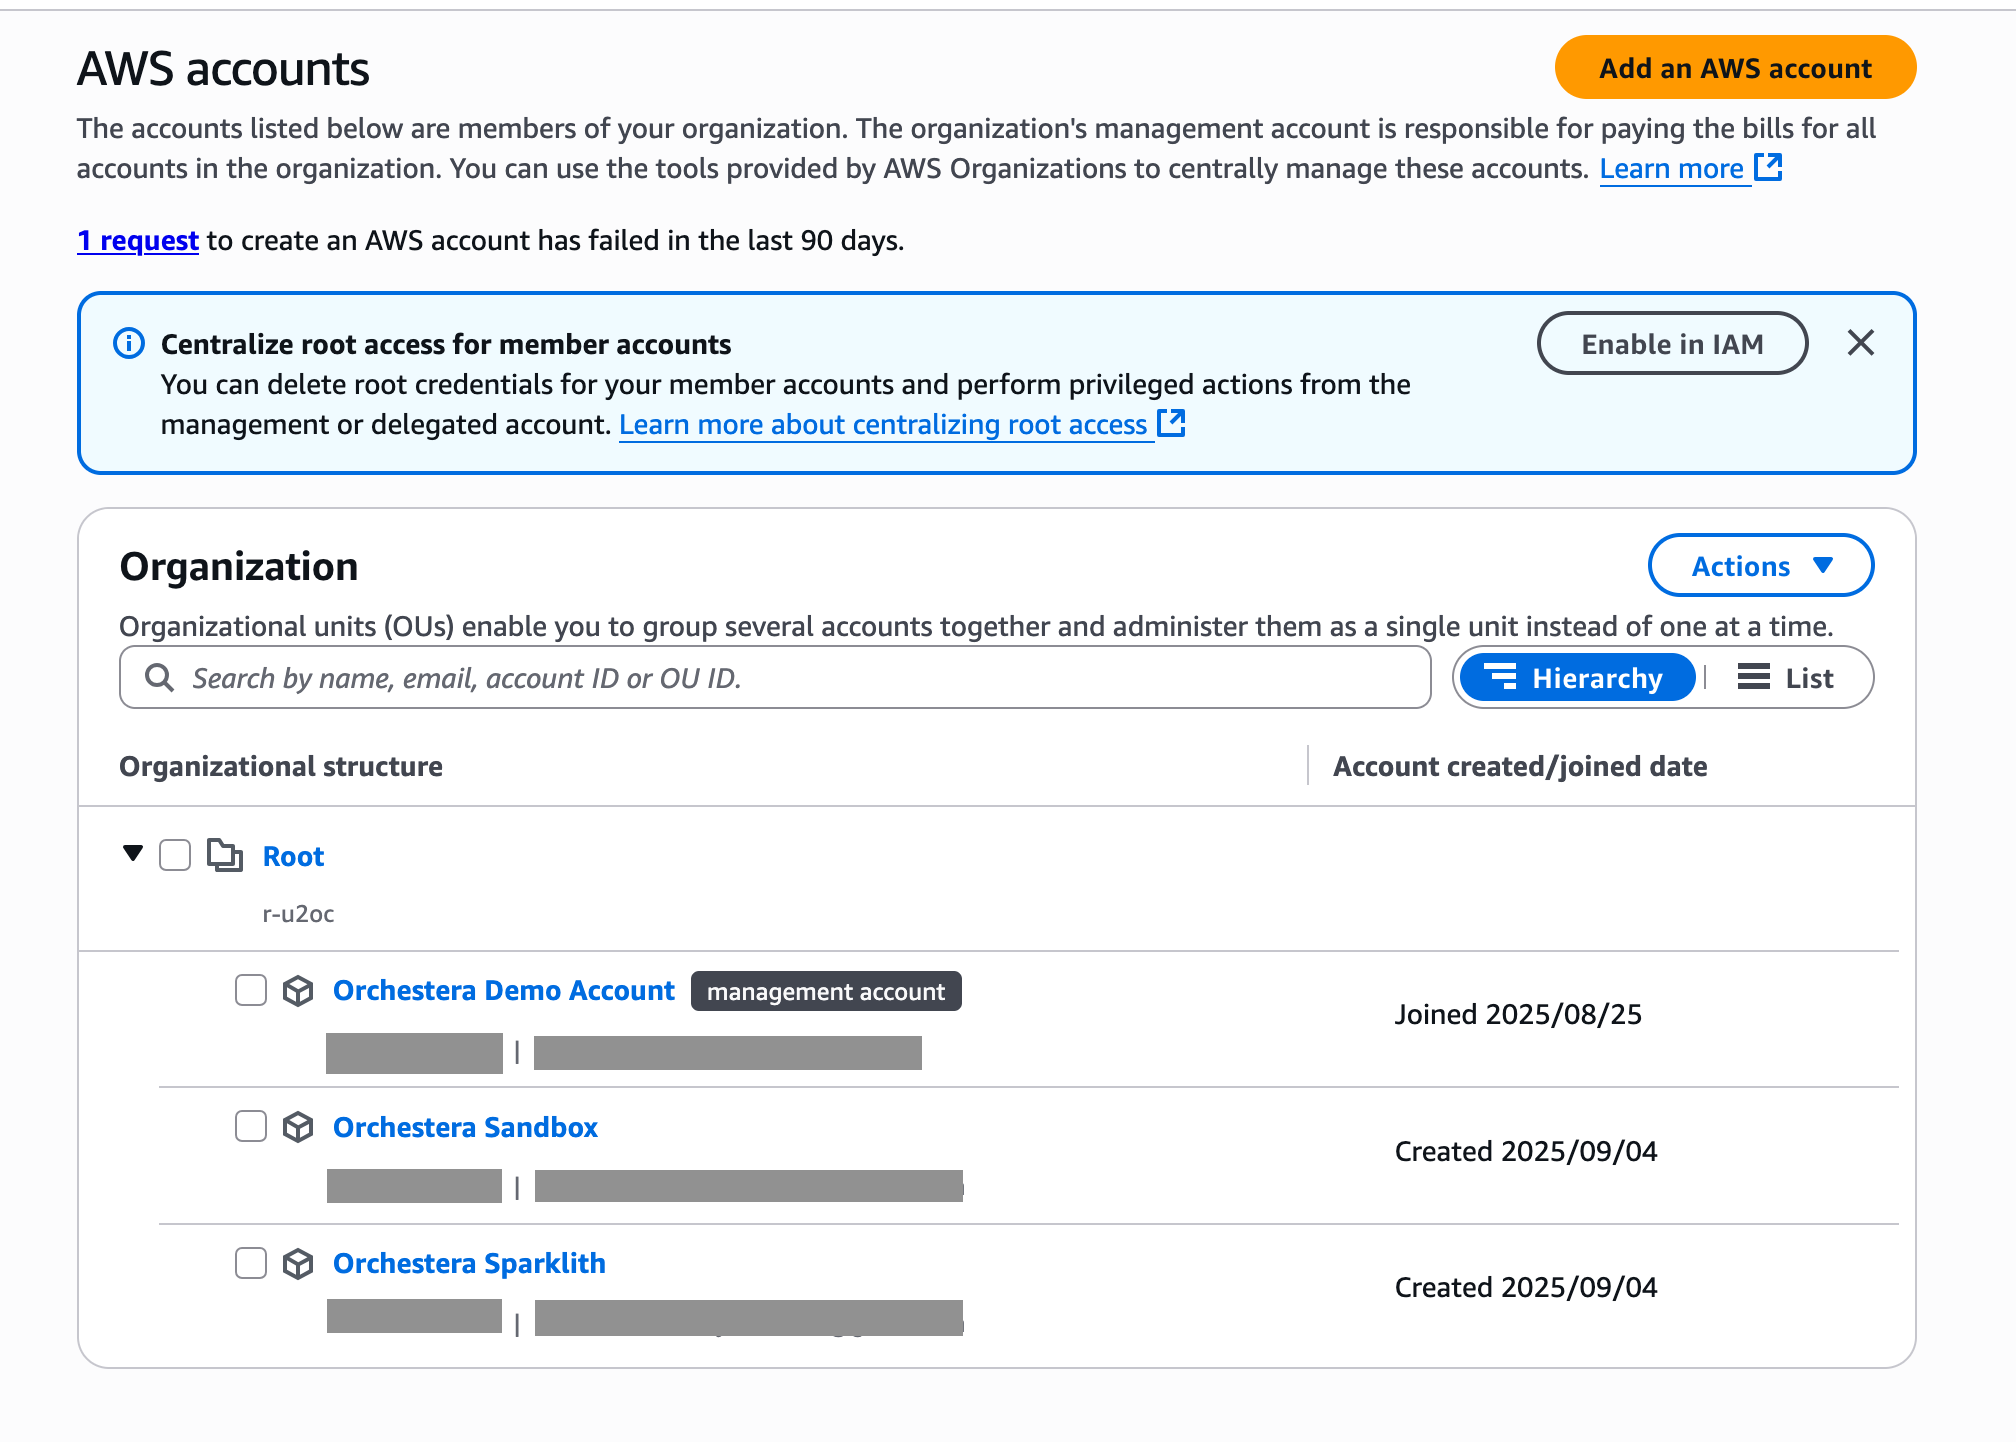
Now, on your AWS Organizations page, you will see something like the following. Take a note of the management account id that would be needed later.
Setup a new AWS Organization
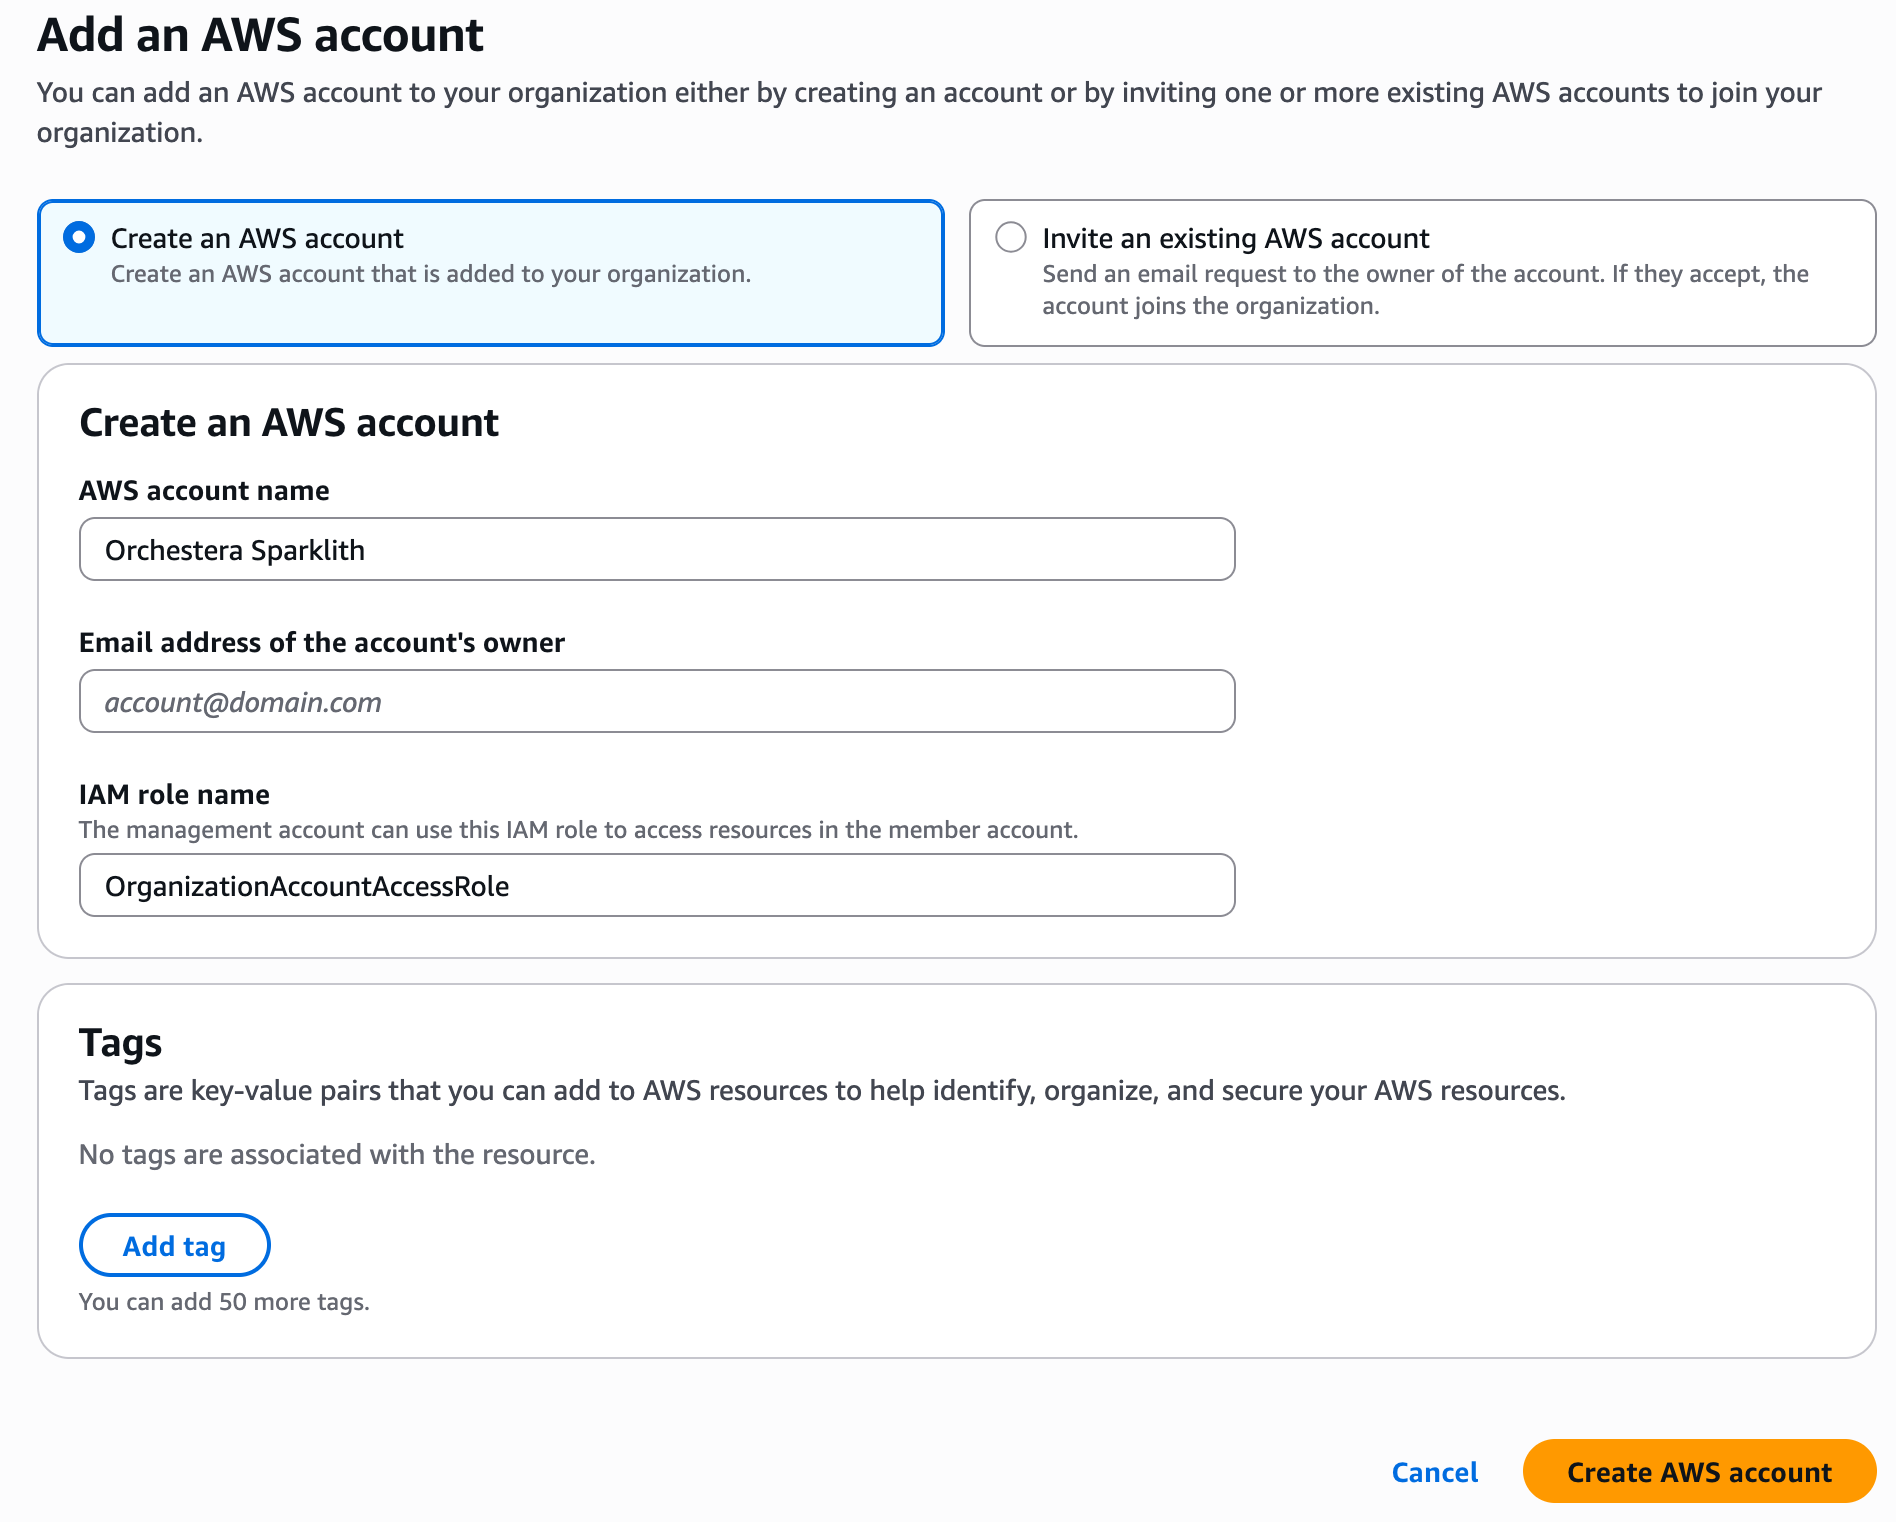
Section titled “Setup a new AWS Organization”You can either create a new AWS account or invite an existing AWS account to your Organization. For the purpose of this tutorial, we will create a new AWS account called Orchestera Sparklith and this is the recommended flow. Make sure to provide an unused email to associate with your new account and also make sure that the IAM role name is set to OrganizationAccountAccessRole. Finally Create the AWS account.
Once your account is created, also note the member account id of this new account under AWS Organizations > AWS accounts page.
At this point, you should have the following two account ids at hand:
- Management account id from when you converted your root account to a management account
- Member account id for
Orchestera Sparklith
Setup IAM roles, users and groups
Section titled “Setup IAM roles, users and groups”While you are still logged-in as root in your management account, go to IAM, navigate to Policies and click Create policy and go through the following steps:
-
On the Visual editor tab, choose Select a service, enter STS in the search box to filter the list, and then choose the STS option.
-
In the Actions section, enter assume in the search box to filter the list, and then choose the AssumeRole option.
-
In the Resources section, choose Specific, choose Add ARNs
-
In the Specify ARN(s) section, choose Other account for Resource in.
-
Enter the ID of the member account
Orchestera Sparklithyou just created -
For Resource role name with path, enter the name of the role that you created in the previous section (OrganizationAccountAccessRole).

-
Choose Add ARNs when the dialog box displays the correct ARN.
-
Choose Next.
-
On the Review and create page, enter a name for the new policy. For example :
GrantAccessToOrganizationAccountAccessRole. You can also add an optional description. -
Choose Create policy to save your new managed policy. The final policy in the JSON format will look like the following:
{ "Version": "2012-10-17", "Statement": [ { "Sid": "VisualEditor0", "Effect": "Allow", "Action": "sts:AssumeRole", "Resource": "arn:aws:iam::<member-account-id>:role/OrganizationAccountAccessRole" } ]}-
Now that you have the policy available, you can attach it to a group.
-
Go back to the IAM > User groups page and click Create group and call it
orchestera-admin-group. -
In the attach permissions policies, select AdministratorAccess and GrantAccessToOrganizationAccountAccessRole that you added in the previous step.
-
Finally, add your relevant IAM users to the
orchestera-admin-groupso that they can switch to theOrchestera Sparkliththat was created previously.
Signing in with an IAM user into Orchestera Sparklith account
Section titled “Signing in with an IAM user into Orchestera Sparklith account”Assuming that you have followed all the steps from the previous section, your IAM users can now login to the Orchestera Sparklith organization as follows.
-
Log out from the root account
-
Go to AWS Console login page
- Enter Account ID of the management account
- Enter your IAM user name
- Enter your password and Sign in
-
Turn on multi-session support if it’s not already turned on
-
Click on Add session > New role
-
In the Account ID box, enter the member account id of your
Orchestera Sparklithaccount -
In the IAM role name, enter
OrganizationAccountAccessRoleand click Switch Role -
Your are now logged into the
Orchestera Sparklithmember account which will be used to setup your Spark EKS clusters
References
Section titled “References”Giving Orchestera Platform access to operate on your AWS account
Section titled “Giving Orchestera Platform access to operate on your AWS account”We established all the pre-requisites in the previous section to setup a separate account to create and manage Spark clusters. In this section, we will grant Orchestera Platform permissions to orchesterate and standup Spark clusters in your new Orchestera Sparklith AWS account.
Create OrchesteraAccessPolicy in your member account
Section titled “Create OrchesteraAccessPolicy in your member account”You should be logged into the member account (Orchestera Sparklith) to create this policy since Orchestera Platform only needs access to your member account.
-
In your member account AWS console, go to the IAM > Policies and click on Create policy
-
Click on the JSON policy editor and replace all the content with the following JSON.
{ "Version": "2012-10-17", "Statement": [ { "Effect": "Allow", "Action": [ "ec2:*", "eks:*", "iam:*", "cloudformation:*", "sqs:*", "pricing:*", "ssm:*" ], "Resource": "*" }, { "Effect": "Allow", "Action": [ "s3:CreateBucket", "s3:DeleteBucket", "s3:PutBucketPublicAccessBlock", "s3:PutEncryptionConfiguration", "s3:PutLifecycleConfiguration", "s3:PutBucketPolicy", "s3:ListBucket", "s3:GetBucketLocation", "s3:GetObject", "s3:PutObject", "s3:DeleteObject" ], "Resource": [ "arn:aws:s3:::orchestera-sh-*", "arn:aws:s3:::orchestera-sh-*/*" ] } ]}- Name the policy
OrchesteraAccessPolicyand click Create policy
Create OrchesteraAccessRole in your member account
Section titled “Create OrchesteraAccessRole in your member account”You should be logged into the member account (Orchestera Sparklith) to create this role.
-
Go to the IAM > Roles and click on Create role
-
In the Select trusted entity section, select AWS account
-
Select Another AWS account and enter the id
017059471480. This is the id of the Orchestera Platform that will orchesterate Spark clusters in your account. You are essentially giving Orchestera Platform to orchesterate resources in your member account. -
Check the option “Require external ID” and enter a unique string into the box. Keep note of this unique string as this will be needed later. Leave the “Require MFA” checkbox unchecked.
-
Click Next and on the permissions page, select
OrchesteraAccessPolicy. -
Set
OrchesteraAccessRoleas the role name and click Create role
You have now successfully setup your AWS account with the right roles and permissions to allow Orchestera Platform to orchesterate Spark clusters for you. In the subsequent sections, you will be able to verify this setup as well.